
Basic Life Support for Infants and Children (for Lay Rescuers)
What is basic life support?
Basic life support is the foundation for responding to individuals who suffer immediate cardiopulmonary arrest. Different variations of this algorithm exist, depending on the age of the victim, and the training of the rescuers involved. In this article, we will be focusing on basic life support for infants and children.
This article is based on the 2010 American Heart Association Guidelines for Cardiopulmonary Resuscitation and Emergency Cardiovascular Care and is tailored to laypersons. It does not constitute official medical advice or guidelines for healthcare professionals or trained individuals.
Child versus Infant Life Support
Basic life support for both infants and children are roughly similar, with only a few differences. Babies less than one year of age fall under the Infant subgroup, while those at least one year of age up until puberty (or teenage years) fall under the Children subgroup. Throughout this article, important differences between these two groups will be emphasized in order to provide the best care.
Part 1: Initial Steps
Oftentimes, witnessing an infant or a child collapse is the first indication for a layperson to perform basic life support. Other troublesome signs that can lead to life-threatening situations include bluish discoloration of the face and body (also known as cyanosis) and significant bleeding.
If you see a child or infant already on the floor and not moving on their own, it is still important to first assume that they have collapsed and need your help. Follow through the initial steps of basic life support to make sure that the victim is safe.
STEP 1: Is the scene safe?
Did you see the child inside the house, or out on the road? The location where the child is found matters. Performing basic life support and resuscitation in unsafe areas can lead to injuries and other life-threatening problems, not just for the victim, but for all rescuers involved, including you. If you think that the area is unsafe, quickly but gently transfer the victim to the nearest safe area, then resume basic life support immediately.
STEP 2: Do we need to do CPR?
Cardiopulmonary resuscitation, or CPR, should be done if the heart isn’t pumping fast enough. This is called cardiac arrest. CPR is required if the victim is unresponsive and not breathing, or only gasping.
1. Is the child responsive?
To elicit a response, assume a kneeling position beside the victim. You may call out to the child and ask, “Are you okay?”. If you know the child’s name, say it aloud. At the same time, you will need to tap on their shoulder. For infants, tap the bottom of their foot repeatedly.
If the victim answers, moans or moves on their own, this is considered “responsive”. CPR is not needed, but the child will still need medical attention. The child may be left for a few moments in order to call for help (911 or ask other bystanders for assistance), or to activate the emergency response system.
If the child is responsive, read on to Part 3 of this article.
If you don’t see any spontaneous movement or verbal response from the child, this is considered “unresponsive”. Call or shout for help.
2. Is the child breathing?
Take a closer look at the victim’s chest to check for any breathing movements. If the child is not breathing at all, start CPR. Gasping for air but may be confused with irregular breathing, but it should also be an indication for CPR.
If the child is breathing on their own, CPR is not needed. Place the child onto their side in a recovery position (lying on one side, with the knee on top pulled upwards and head tilted slightly upwards).
If the child is spontaneously breathing, read on to Part 3 of this article.
If you don’t see the infant or child consistently breathing, begin CPR.
Part 2: CPR
You will need to start giving chest compressions and rescue breaths to the child. Although two or more people are preferred, you can still perform CPR even as a lone rescuer.
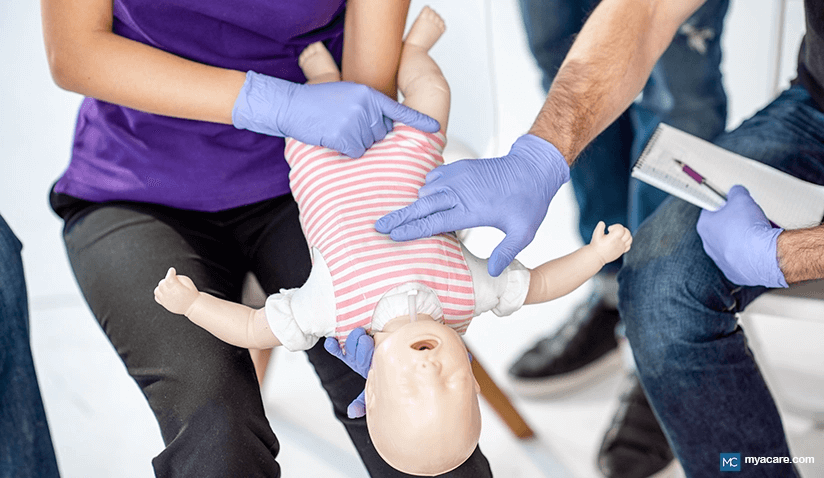
STEP 3: Start chest compressions
Place yourself in a kneeling position on one side of the victim. If possible, ensure that the surface where you and the victim are in is firm.
For infants, use two fingers on top of the victim’s breastbone. For younger kids, you may use one hand only. For older children and adolescents, place one hand on top of the other. Place your hand (or hands) on top of the lower half of the child’s breastbone and straighten your elbows.
Push hard at a pace of 100 compressions per minute. For infants, every push must be as deep as 1.5 inches or 4 cm. For children, every push should be as deep as 2 inches or 5 cm. Make sure that the chest springs back up on its own (recoils) before you start another push. As much as possible, keep chest compressions continuous and avoid interruptions unless necessary.
STEP 4: Follow with rescue breaths
Count the number of chest compressions once you start. CPR is a combination of chest compressions and rescue breaths or ventilation, with the ratio depending on the number of rescuers available. If you are a lone rescuer, you will need to do 30 compressions first, followed by 2 rescue breaths. If you have another rescuer with you, do 15 chest compressions, followed by 2 rescue breaths.
Open the airway by tilting the head upwards and lifting the chin at the same time. Rescue breaths are performed differently, depending on the age group of the victim. For infants, seal their nose and mouth with your mouth. For children, pinch their nose and seal their mouth with your own mouth. Blow as much air as you can for one second. Make sure to do 2 rescue breaths, and check that the victim’s chest rises whenever you give a rescue breath.
If you are a lone rescuer, do 5 cycles of compressions and rescue breaths (around 2 minutes) first before looking for an automated external defibrillator (or AED) or activating the emergency response system.
If there are at least 2 rescuers, one rescuer should start CPR while the other should look for help by activating the emergency response system or obtaining an AED.
STEP 5: Continue CPR
CPR can be tiring for rescuers. If you are with another rescuer, take turns doing chest compressions. Switch every 2 minutes (equivalent to around 5 cycles). Make sure to switch positions within 5 seconds, to avoid interrupting the flow of CPR.
It is advised to continue giving CPR until any of the following occur:
a. A spontaneous response or movement from the patient
b. An AED arrives
c. A trained responder or healthcare professional arrives
d. You become exhausted
e. The scene becomes unsafe
Part 3: When the victim is able to respond
Once the victim is stabilized or is able to respond, call for help if this was not yet previously done. For victims who are older children and adolescents, you may ask them what happened. Quickly look for any life-threatening injuries. Allow them to move to a position they are most comfortable with.
Once trained responders or healthcare providers arrive, provide them with as much information as you can about the resuscitation effort.
Conclusion
Basic life support starts with a safe environment, proper assessment of response and breathing, and follow through with CPR or recovery care. It can be done by anyone, even laypersons and bystanders, as long as the proper steps are followed.
To search for the best pediatric healthcare providers in Germany, India, Malaysia, Singapore, Spain, Thailand, Turkey, the UAE, the UK and The USA, please use the Mya Care Search engine
To search for the best healthcare providers worldwide, please use the Mya Care search engine.
Dr. Sarah Livelo is a licensed physician with specialty training in Pediatrics. When she isn't seeing patients, she delves into healthcare and medical writing. She is also interested in advancements in nutrition and fitness. She graduated with a medical degree from the De La Salle Health Sciences Institute in Cavite, Philippines and had further medical training in Makati Medical Center for three years.
Sources:
Featured Blogs
Medically Induced Coma: What It Is, How It Works, Who Benefits, and Recovery Outcomes